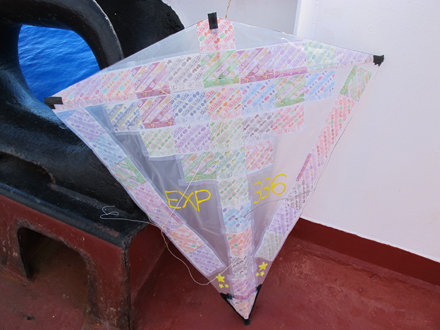
Kitemaking 101, or “How I Learned to Make a Kite out of Dum-Dum Wrappers”
I have never made a kite before. I can count on the fingers of one hand the number of times I’ve flown a kite. I do like the Mary Poppins song “Let’s Go Fly a Kite,” though, and although I don’t have tuppence for paper and string, I do have the Internet, a garbage bag and about four dozen Dum-Dum lollipop wrappers!
The first step (for me) was to find an Internet tutorial to help me out. I found this lovely diamond kite on My Best Kite: http://www.my-best-kite.com/make-a-diamond-kite.html. The first sentence really caught my attention: “This set of instructions on how to make a Diamond kite assumes you know absolutely nothing about kite making.” Hooray…that’s me! It was a wonderful tutorial; very easy to follow, with lots of pictures. Turns out there’s math involved in making my kite (who knew?). Since the wooden sticks, or dowels, that I had available were shorter than the ones in the directions, I had to scale everything down. I gathered all of the materials I would need to make the kite: one plastic garbage bag, 48 Dum-Dum wrappers, electrical tape, wooden doweling, scotch tape, and some paint and stickers. Then, I just had to follow the directions.
I measured and traced the diamond pattern onto the garbage bag. Next, I decorated it with the Dum-Dum wrappers, paint and stickers, trying to make sure that it was balanced as I went.

I made a pocket for the vertical spar at the bottom, and made a corner strap to hold it in at the top. I attached the horizontal spar at the corners with electrical tape. Then, these two spars were tied together with string to hold them in place.


Kites work like the sails of a ship, so you need to put a curve into the horizontal spar. This is done by pulling the tips of the spar toward each other using a loop-and-toggle system, so the kite can still be disassembled and stored flat. Pretty nifty!


Now it was time to rig it up for a test drive. I followed the directions on how to tie up the bridle loop, bridle line, and kite-flying line. Thank goodness for sea scouts and my knot-tying ability! I was able to learn a few new knots lickety-split. When I took it out for a test drive, it was really wobbly, so I added a tail. My tail wasn’t long enough, so one of the engineers, Tom, helped me add some more tail to stabilize it.


Sadly, there wasn’t enough wind today to hold our big kite flying contest, but I’ve got a little bit of flying experience now and I’m ready to take on the competition tomorrow! Let’s go fly a kite!